












NEWS
Floating Lid Wine Tanks Losing Seal Pressure: Leak Checks That Matter
A floating lid that needs another pump-up before the next shift is easy to dismiss as a minor nuisance. But when floating lid wine tanks lose seal pressure, topping up the inflatable gasket may restore the gauge reading without fixing the leak. The maintenance task is to distinguish genuine air loss from temperature-related changes, then locate the fault without exposing the wine to unnecessary handling or contamination.
A failing perimeter seal can increase oxygen exposure and put wine quality at risk. Yet replacing the gasket immediately is not always the right answer: a loose hose connection, leaking valve, or misleading gauge can produce similar symptoms. A controlled check saves parts, downtime, and repeated visits to the same tank.
Before testing, establish what is actually losing pressure
The inflatable gasket is a separate air circuit; its pressure is not the tank’s internal pressure. A floating-lid tank should never be treated as a pressure vessel unless specifically designed and rated for that duty. Do not pressurize the tank to find a seal leak, and do not exceed the gasket manufacturer’s inflation limit.
Record the starting gauge reading, ambient temperature, wine temperature if available, lid position, and time since inflation. Note whether the problem appeared after cleaning, lid movement, hose replacement, or a temperature change. These details often reveal more than another pump stroke.
- A drop after the cellar cools: cooling can reduce the pressure in the gasket even without leakage. Compare readings under similar temperature conditions before condemning a component.
- A drop immediately after inflation: suspect the pump connection, valve, fittings, or a larger gasket leak, while allowing for initial air cooling and gasket settling.
- A stable reading with poor perimeter contact: investigate lid alignment, gasket size, tank-wall condition, and whether the gauge actually reads the gasket side of the circuit.
Pressure alone does not prove sealing. A gauge isolated upstream of a closed valve may retain a reading while the gasket loses air downstream. Confirm the circuit layout before relying on the dial.
Make the inspection safe for the technician and the wine
Keep the lid supported according to the manufacturer’s procedure whenever deflation could let it tilt or move. Isolate powered lifting equipment before hands enter pinch points. Never reach beneath an unsupported lid or enter the tank for this inspection.
If the seal is already compromised, coordinate with the cellar team to protect the wine using their approved temporary covering or inert-gas procedure. Inert gases introduce an asphyxiation hazard, so ventilation and site safety controls still apply. Avoid repeatedly lifting the lid simply to “have a look.”
Use clean tools and a leak-detection solution suitable for the materials and winery hygiene procedure. Keep it away from wine and product-contact surfaces. Household detergents can leave fragrance or residues; they are not a default choice. Any treated surface that could contact wine must be cleaned and sanitized before return to service.
Trace the air path before removing the gasket
Follow the circuit in order: pump connection, hose, valve, gauge fittings, and gasket inlet. Inflate only to the specified operating range, let the reading settle, and watch for bubbles that grow continuously. Foam left by brushing on a solution is not, by itself, evidence of leakage.
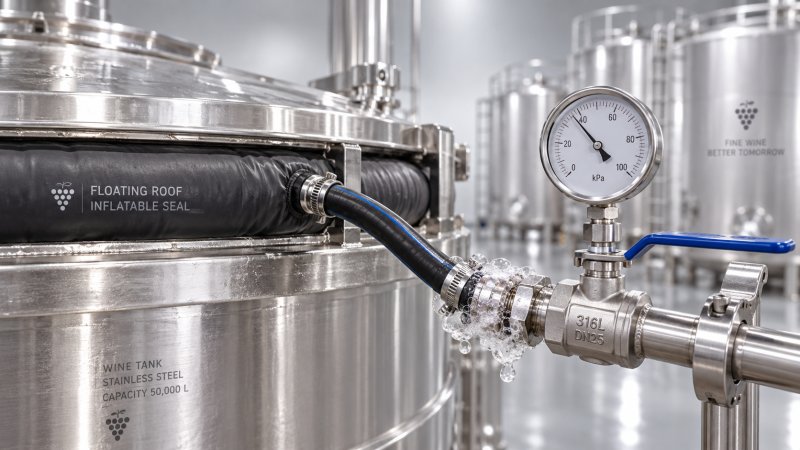
Pump connection and hose
Check coupling engagement, sealing washers or O-rings, hose clamps where fitted, and the hose near bends. Flexing and rubbing often damage a hose at the pump outlet or gasket inlet. Look for cracks, flattening, hardening, and abrasion rather than inspecting only the straight sections.
If the pump is intended to remain connected, include its check valve in the test. If it is designed to disconnect after inflation, follow that arrangement instead. Air can escape backward through a defective check valve even when the gasket itself is sound.
Valve and gauge fittings
Apply a small amount of approved detection solution around valve stems, joints, and gauge connections. Persistent growing bubbles identify an external leak. A valve leaking internally may require an isolation test because it will not necessarily produce bubbles at its body.
Do not cure every threaded leak by tightening harder. Over-tightening can damage threads, distort seals, or crack a small fitting. Depressurize before dismantling, then use the specified seal or sealant. If the dial sticks or responds inconsistently, compare it with a suitable verified gauge; an inaccurate gauge can prompt dangerous overinflation.
Gasket inlet and perimeter
The inlet attachment deserves close attention because hose movement places stress on it. Inspect the full accessible perimeter for cuts, seam separation, pinholes, and areas trapped beneath the lid edge. Where checking the underside requires removal, protect the wine and transfer the assembly to a clean, supported work area.
A leak that appears only when the lid moves may indicate an inlet under strain, a crease, or damage that opens under deformation. Do not deliberately twist an inflated gasket beyond its intended movement to reproduce the fault.
Use isolation to separate a gasket leak from an accessory leak
When visual checks are inconclusive, divide the air circuit using manufacturer-approved valves, caps, or test fittings. Do not pinch the hose with pliers: that can create the next leak while concealing the current one.
A useful test isolates the inflated gasket from the pump and hose while monitoring pressure on the gasket side. If pressure stabilizes under comparable temperature conditions, investigate the disconnected accessories. If it continues falling, focus on the gasket, its inlet, and any fittings still included in that section.
Keep a simple time-and-pressure log and repeat the test after repair. There is no universal acceptable pressure drop or hold duration for all floating lid wine tanks. Gasket volume, flexibility, temperature, and the equipment supplier’s criteria affect interpretation. A short successful check may miss a slow leak that matters during storage.
When pressure holds but the lid still does not seal
A sound air circuit can still leave gaps around the wine tank. Inspect whether the lid sits level and whether the gasket contacts the wall uniformly. Residue, a rolled gasket section, an incorrect gasket profile, or a dented wall can interrupt contact without causing air loss.
Clean accessible contact surfaces using the approved procedure. Check that the replacement gasket matches the tank diameter, lid design, material requirements, and inflation specification—not simply that it looks similar.
Do not use extra pressure to force a poor fit. If correct positioning and inflation do not produce uniform contact, investigate dimensional mismatch or mechanical damage. A burr or sharp edge must be corrected before installing another gasket, or the replacement may fail in the same place.
Choose the repair that removes the cause
Reseat a sound connection when incorrect assembly caused the leak. Replace hardened hoses, damaged valve seals, defective gauges, and gaskets with cuts or seam damage using approved parts. Adhesive patches are not a routine repair unless the gasket manufacturer explicitly permits them and confirms suitability for wine-contact service and cleaning conditions.
After repair, verify both pressure retention and perimeter contact. Include any normal, permitted lid adjustment in the check, then reinspect the hose routing. Leave enough freedom for intended movement without allowing the hose to snag or pull on the inlet.
Shandong Weike Machinery Equipment Co.,Ltd designs, manufactures, installs, and commissions stainless steel vessels for wine, brewing, and beverage facilities. When requesting support, provide the tank identification, gasket details, circuit photographs, and pressure log rather than only reporting “the lid leaks.”
For mixed-product facilities, keep maintenance records equipment-specific. Weike’s Food Grade Stainless Steel Syrup Mixing Tank offers SUS304 or SUS316L construction and configurable mixing and jacket arrangements, but its maintenance requirements differ from an inflatable wine-tank seal. Shared stainless steel construction does not make pressure limits, seals, or cleaning procedures interchangeable.
Close the service job with a documented operating pressure, hold-test result, temperature conditions, replaced parts, and follow-up interval. The repair is complete when the seal performs reliably—not merely when the gauge has been topped up again.