












NEWS
Cleaning Floating Lid Wine Tanks: Gaskets, Lid Undersides, and Outlets
Cleaning Floating Lid Wine Tanks: Gaskets, Lid Undersides, and Outlets
A clean tank wall does not guarantee a hygienic wine vessel. In floating lid wine tanks, gasket folds, lid undersides, and outlet assemblies can retain wine residues and harbor spoilage microorganisms when cleaning misses hard-to-reach surfaces. These areas deserve targeted inspection, material-compatible cleaning procedures, and documented verification before the next fill.
The practical challenge is access. A spray pattern that washes the cylindrical shell may not reach behind an inflatable seal or inside a valve seat. Reliable sanitation starts by identifying which surfaces require disassembly, not by extending a cleaning cycle that never reaches them.
Make the lid safe to handle before cleaning begins
Drain the vessel and isolate connected pumps, transfer lines, and any powered lifting equipment according to the site’s isolation procedure. Release gasket pressure as specified by the tank manufacturer. Secure the lid with approved lifting arrangements; never depend on the inflatable gasket to support it during maintenance.
An open top does not make tank entry safe. Residual carbon dioxide, oxygen deficiency, chemical exposure, and unexpected equipment movement remain hazards. Prefer external access and removal of components. Where entry is unavoidable, use the applicable confined-space assessment, atmospheric testing, isolation, and rescue arrangements rather than treating the job as routine washing.
Prepare a clean rack for the lid and a separate tray for valve parts. Placing cleaned components on the cellar floor can undo the work before reassembly. Check chemical safety data and provide the required eye, skin, and respiratory protection for the cleaning method.
Gaskets: clean the contact surfaces, not just the visible ring
Inflatable lid seals create folds and contact zones where wine films can remain after a general rinse. If the design permits removal, take the gasket off following the manufacturer’s instructions. Clean its outer surface, the face against the lid, and the retaining channel separately. Avoid stretching the seal or forcing tools under it.
Use a detergent approved for the actual gasket material. “Food-grade” does not establish compatibility with every alkaline cleaner, acid, sanitizer, or cleaning temperature. Obtain the elastomer specification and chemical limits from the supplier; stainless-steel compatibility alone is not enough.
A soft, dedicated brush can help expose and remove residue in folds. Follow the detergent instructions for concentration, temperature, and contact time, then rinse as required. Forcing a higher concentration is not a substitute for reaching the contaminated surface.
- Inspect for splits, tackiness, swelling, hardening, and permanent deformation.
- Check the air connection and accessible joints for damage or leakage.
- Confirm that the cleaned seal sits evenly without twisted or pinched sections.
- Replace seals with cracks, persistent deposits, or damage that prevents reliable cleaning or sealing.
Pressure retention should be checked at the manufacturer’s specified operating pressure. A seal can look clean yet fail mechanically; it can also hold pressure while remaining contaminated. These are separate checks.
The lid underside needs direct exposure
The underside may collect splashed wine, condensation, and dried deposits around welds or fittings. Lift or remove the lid so these surfaces can be seen and reached safely. Inspect the perimeter, gasket channel, and any product-facing bosses or fittings—not only the broad central panel.
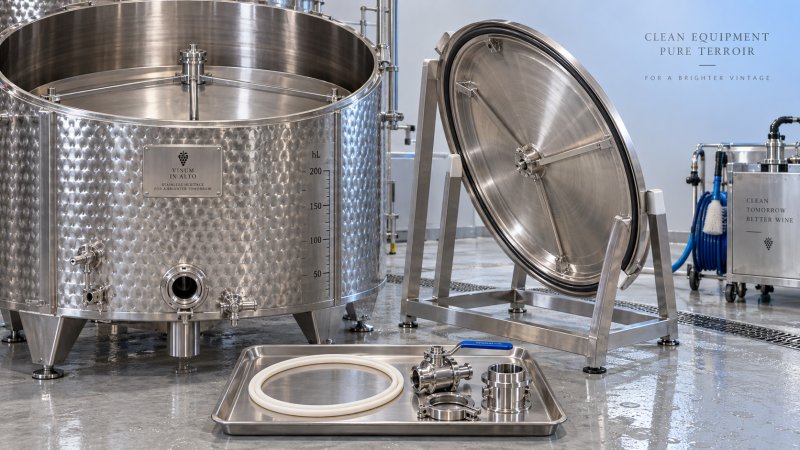
Rinse away loose soil before applying detergent. Use non-abrasive tools suitable for stainless steel; carbon-steel brushes can leave iron contamination, while aggressive abrasion can damage the surface. Persistent tartrate deposits may require a separate, material-compatible descaling step after organic soil removal.
Keep chemical stages separate and follow the specified intermediate rinses. Never mix incompatible products, particularly acidic cleaners and chlorine-containing chemicals. Protect inflation connections from unintended liquid ingress, and inspect the lid again under good lighting before sanitizing.
Outlets and valves are where a clean-looking tank can fail
Lees and wine residues can collect in outlet transitions, valve seats, sample ports, and attached hoses. Passing rinse water through an open outlet does not demonstrate that every internal surface has been cleaned. Some parts remain shielded unless the assembly is dismantled.
Remove detachable outlet components according to the equipment instructions. On butterfly valves, inspect the disc-to-seat interface and the seal surfaces exposed by approved disassembly. Clean sample valves using their specific procedure; small passages and threaded connections need particular attention. Replace damaged seals rather than compensating by overtightening clamps.
Keep hoses, transfer fittings, and drain connections within the same hygiene boundary. A sanitized tank connected to a dirty hose is not ready for filling. After reassembly, check alignment, leak tightness, drainage, and any pockets where rinse water remains.
CIP capability must match the actual geometry
Clean-in-place performance depends on spray coverage, flow, chemistry, temperature, and drainage. A spray device cannot reliably clean a surface hidden behind a seal or closed valve. Establish which components the validated cycle covers and which require manual cleaning or cleaning out of place.
This distinction also matters when comparing beverage vessels. Shandong Weike Machinery Equipment Co.,Ltd’s 1000L juice fruit tanks list a rotary CIP spray ball, sample valve, fruit juice and drain outlet assembly, and side rectangular manway. These features provide useful points for a cleanability review, but that juice-tank configuration is not evidence of floating-lid cleaning coverage.
The company designs, manufactures, installs, and commissions stainless-steel vessels from its Jinan facility of over 15,000 square meters and offers five years of after-sales service. For a winery project, the useful discussion is specific: request gasket material details, lid-handling instructions, valve disassembly drawings, chemical compatibility limits, and replacement-part availability.
Release the tank on evidence, not appearance alone
Cleaning removes soil; sanitizing reduces microorganisms on already-clean surfaces. Apply the selected sanitizer only after cleaning acceptance, using its approved concentration and contact time. Follow label requirements for rinsing, draining, and use before product contact.
Verification should focus on the points most likely to be missed: gasket folds, the retaining channel, underside fittings, valve seats, and sample ports. Visual inspection is essential, but it cannot confirm microbiological condition. ATP testing can support rapid hygiene checks, although it is not a direct test for wine-spoilage organisms. Use risk-based microbiological sampling where the winery’s verification plan requires it, with methods and acceptance criteria appropriate to the site.
Record the tank identifier, components removed, cleaning and sanitation conditions, inspection findings, seal replacements, and release decision. If an outlet repeatedly fails checks, investigate access, retained liquid, seal condition, and the cleaning method before simply increasing sanitizer strength.
Before the next fill, confirm that the lid is securely reinstalled, the gasket holds its specified pressure, all product-contact assemblies are released, and the cleaned vessel has remained protected. If filling is delayed, follow the site’s defined hold-time and re-sanitization procedure.